

The ability to produce a high-decibel, piercing whistle using one’s fingers is a skill that occupies a unique space between traditional survival utility and social showmanship. Historically employed by shepherds, sailors, and urban dwellers alike, the finger whistle—often referred to as the "commanding whistle"—serves as a non-verbal communication tool capable of cutting through significant ambient noise. While often perceived as an innate talent passed down through generations, recent instructional data and physiological analysis suggest that the skill is a mechanical process that can be mastered through disciplined practice and an understanding of aeroacoustics.
The Mechanics of Sound: How the Finger Whistle Functions
To understand how to produce a whistle, one must first understand the physics of air turbulence. A finger whistle is essentially an "edge-tone" instrument. In this configuration, the human mouth acts as a resonant chamber, and the fingers, combined with the tongue and lips, create a precise aperture and a sharp edge, or bevel.
When air is forced through this aperture, it strikes the edge created by the tucked lips and the positioned tongue. This causes the air to oscillate, creating pressure waves that we perceive as sound. The volume of the whistle is determined by the force of the exhalation (the "blast"), while the pitch is determined by the size of the resonant cavity within the mouth. By manipulating the fingers and tongue, the practitioner can achieve sounds reaching 120 to 130 decibels—levels comparable to a chainsaw or a pneumatic drill. This intensity explains why the skill remains a preferred method for hailing taxis in dense urban environments or signaling across vast distances in rural settings.
Historical Context and Cultural Significance
The finger whistle has deep roots in human history, appearing in various cultures as a primary mode of long-distance communication. In the Canary Islands, specifically on the island of La Gomera, a whistled language known as Silbo Gomero was developed to communicate across deep ravines and valleys. While Silbo Gomero is a complex linguistic system, it utilizes the same basic physiological principles as the finger whistle to project sound over distances of up to two miles.

In the 20th century, the finger whistle became a staple of cinematic iconography, frequently used by characters in "noir" films to signal distress or by sports enthusiasts to gain attention in crowded stadiums. Despite its prevalence in mid-century culture, sociologists note a "generational skill gap" in the 21st century. As digital communication and ride-sharing apps replaced the need for audible signaling, the informal apprenticeship of the skill—from father to son or grandfather to grandchild—began to wane. This has led to a recent resurgence in demand for technical tutorials, as modern individuals seek to reclaim "analog" skills that offer immediate practical utility.
Methodology: The Two Primary Techniques
Instructional data suggests there are two primary finger configurations that yield the most consistent results for beginners. Both methods serve the same two functions: they hold the tongue in a retracted position and ensure the lips are tautly drawn over the teeth.
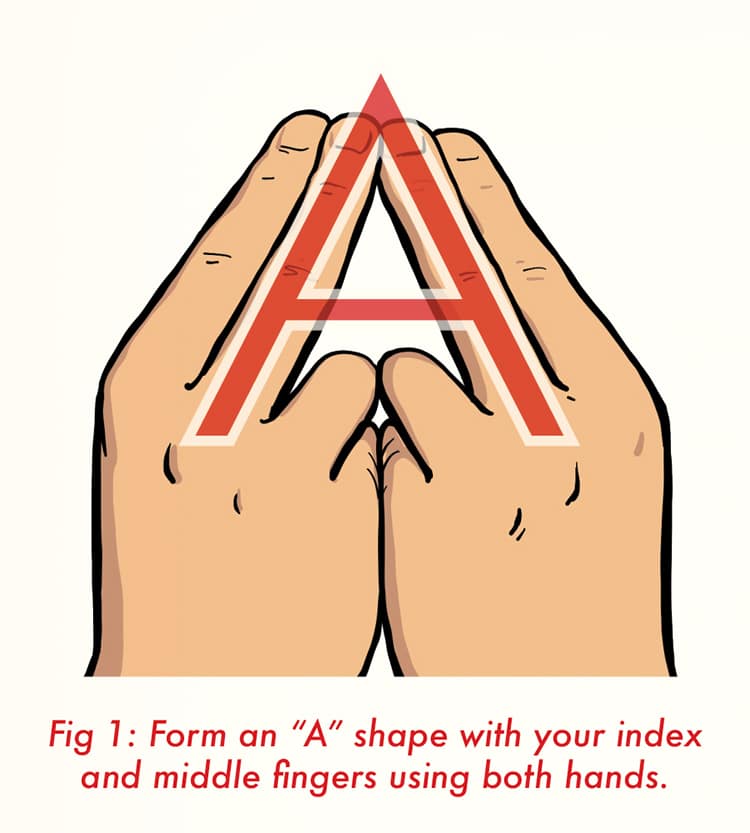
The Two-Handed "A-Frame" Combination
This method is widely considered the most powerful and is often the first technique taught to novices.
- Finger Alignment: The practitioner extends the middle and index fingers of both hands. The remaining fingers (ring and pinky) are held down by the thumbs.
- The Fulcrum: The tips of the two middle fingers are brought together to form an "A" or "V" shape.
- Utility: This configuration provides maximum stability, allowing for a higher volume of air to be displaced. It is the preferred method for emergency signaling or large-scale events.
The One-Handed "OK" Sign
The one-handed method is valued for its convenience, allowing the practitioner to signal while keeping one hand free.
- The Loop: The practitioner forms a circle by touching the tip of the thumb to the tip of either the index or middle finger.
- Placement: This "OK" sign is then inserted into the mouth, utilizing the curve of the fingers to manage tongue placement.
- Utility: While slightly more difficult to master due to the precision required in the "seal," it is the standard for urban signaling, such as hailing a cab while carrying luggage.
Step-by-Step Technical Breakdown
Mastering the whistle requires a specific sequence of physiological adjustments. Failure to execute any of these steps typically results in a "hissing" sound rather than a clear tone.
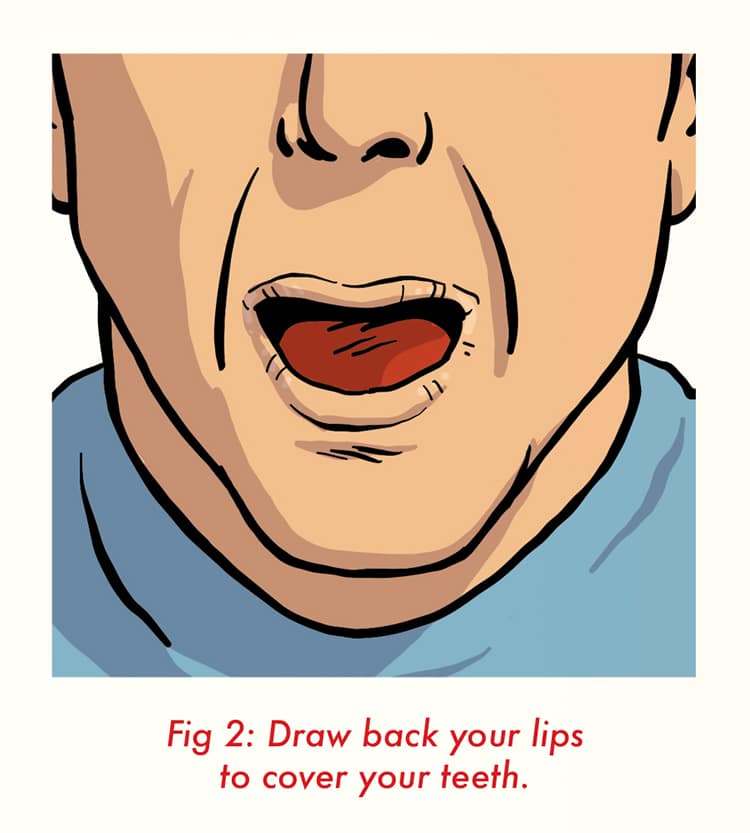
1. Lip Preparation and Positioning
The lips must act as a firm, vibrating surface. Practitioners are advised to moisten the lips to reduce friction. The crucial step is the "tuck": the lips must be drawn back over the teeth, effectively hiding them. This creates a smooth, firm surface for the air to pass over. The fingers serve to hold the lower lip in this position during the high-pressure exhalation.
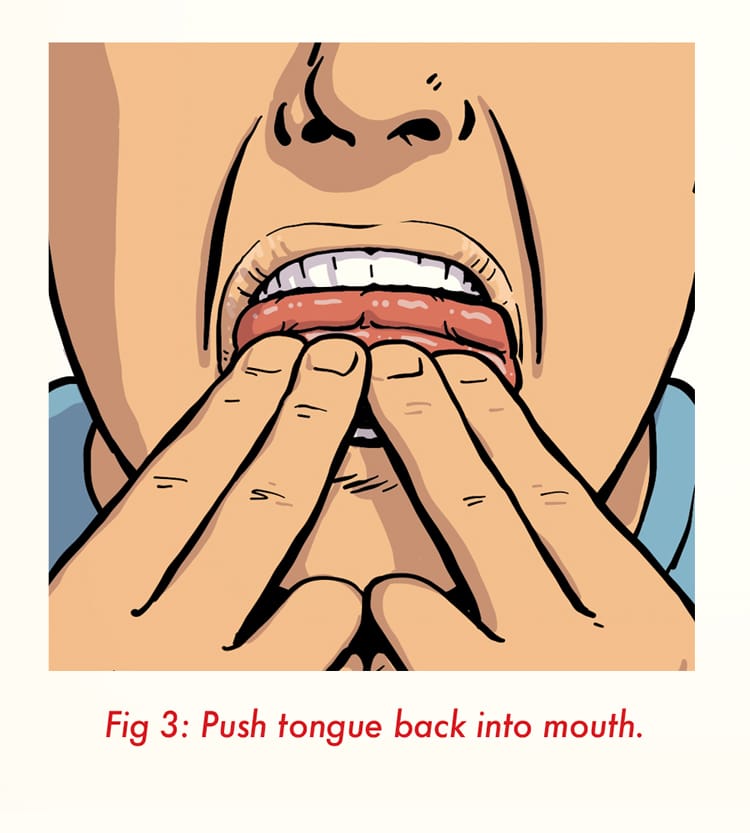
2. Tongue Manipulation
The tongue is the most common point of failure for beginners. It must be retracted to create a clear air path. The most effective technique involves using the fingers to fold the tip of the tongue back upon itself. This creates a baffle that directs the air downward and then outward over the lower lip. The fingers should be placed roughly at the first joint, pushing the tongue into the rear of the oral cavity.
3. Establishing the Seal
Once the fingers and tongue are in place, the mouth must be closed firmly around the fingers. A "perfect seal" is required; any air escaping from the corners of the mouth will dissipate the pressure needed to generate the whistle. The only exit point for the air should be the small aperture between the fingers.
4. Controlled Exhalation
The final step is the "blow." Beginners are encouraged to start with a soft, steady stream of air to locate the "sweet spot." Once a faint, flute-like tone is achieved, the force of the air can be increased. Practitioners must ensure that the tongue does not slip forward and block the aperture during this process.
Chronology of Mastery: The Learning Curve
Data gathered from instructional workshops and self-taught practitioners indicates a predictable timeline for skill acquisition. While some individuals may take weeks of intermittent attempts, a dedicated session of 40 to 60 minutes is often sufficient to achieve the first audible tone.
- 0–15 Minutes: Initial frustration. Most attempts result in nothing but the sound of rushing air. Practitioners often experience "lightheadedness" due to improper breathing techniques.
- 15–30 Minutes: Adjustment phase. The practitioner begins to experiment with finger angles and the depth of the tongue tuck. Minor "tweaks" to lip tension are made.
- 30–45 Minutes: The "Beer Bottle" effect. The practitioner begins to produce a low-frequency sound similar to blowing over the top of a glass bottle. This indicates that the mechanics are correct, but the pressure or seal is insufficient.
- 45–60 Minutes: Achievement of the high-pitched tone. Once the "sweet spot" is identified, the muscle memory begins to set in, allowing for consistent reproduction of the sound.
Safety Considerations and Physiological Impact
While the finger whistle is a harmless skill, the learning process involves physiological strains that require caution. Medical professionals note that repetitive, forceful exhalation can lead to hyperventilation. Symptoms include dizziness, tingling in the extremities, and headaches. It is recommended that practitioners take breaks every five minutes during the initial learning phase to allow CO2 levels in the blood to stabilize.
Furthermore, hygiene is a significant factor. Because the skill requires placing fingers inside the mouth, practitioners must ensure their hands are thoroughly cleaned to prevent the transmission of pathogens. This is particularly relevant in public or urban environments where the skill is most likely to be used.
Broader Implications and Modern Utility
In an era dominated by digital alerts, the finger whistle remains a relevant tool for its reliability and range. From a search-and-rescue perspective, a whistle can be heard much further than a human shout and requires less energy to produce over long periods. In urban planning and sociology, the "cab-hailing whistle" is often cited as a piece of "intangible cultural heritage"—a skill that defines the character of city life.
The mastery of the finger whistle also provides a psychological benefit. It represents the successful acquisition of a difficult physical coordination task, often described by practitioners as an "achievement unlocked" moment. This boost in self-efficacy, combined with the practical utility of the skill, ensures that despite the advancement of technology, the commanding whistle will continue to be a valued human capability.
Conclusion: The Persistence of Analog Skills
The resurgence of interest in finger whistling highlights a broader trend: the desire for self-reliance and the preservation of traditional human skills. As this guide demonstrates, what appears to be a "magic trick" is actually a sophisticated application of human anatomy and physics. By following the structured methodology of finger placement, lip tension, and tongue retraction, any individual can master this age-old technique. Whether used for safety, utility, or simple tradition, the commanding whistle remains a powerful testament to the versatility of human communication.
